Battery
Dry Charge Batteries
 (1)")
Motofine Conventional (Dry Charge) Batteries
We offer a wide range of Dry Charge / Conventional Batteries designed for vehicles that do not require SMF battery technology. These batteries provide strong performance, reliable starting power, and long service life—all at a more economical price point.
Motofine Conventional Batteries are built with filler caps and vent tubes, allowing periodic maintenance when required. Each battery features sealed, corrosion-resistant posts, along with durable polypropylene containers and heat-sealed construction that results in a strong, leak-resistant unit.
To enhance performance, our batteries incorporate special separators and through-partition construction, optimizing internal efficiency and power delivery.
Thanks to the use of thin, high-performance separators, we are able to include additional plates in each cell, increasing the active surface area.
As a result, Motofine Conventional Batteries deliver up to 30% more cranking power than standard conventional batteries of comparable size — ensuring more reliable starts and stronger performance.
- 20% – 30% more starting power than conventional batteries
- More plates per cell
- High cranking under different climatic conditions
- Anti Sulfation Protection given for consistent performance
- Battery Containers designed for ultra-low vibrations, high durability and longer service life
- Low self-discharge means longer ideal life even after adding electrolyte
| S.no. | Model | Charging | Terminal | Voltage(V) | Capacity(Ah) | L(mm) | W(mm) | H(mm) |
| 1 | 6N4-2A | DC | ,- | 6 | 4 | 71 | 71 | 96 |
| 2 | 6N4-2A-2 | DC | ,- | 6 | 4 | 71 | 71 | 96 |
| 3 | 6N4-2A-42 | DC | ,- | 6 | 4 | 71 | 71 | 96 |
| 4 | 6N4-2A-7 | DC | ,- | 6 | 4 | 71 | 71 | 96 |
| 5 | 6N6-3B-1 | DC | -, | 6 | 5 | 99 | 57 | 111 |
| 6 | 6N6-1B-1 | DC | -, | 6 | 5 | 99 | 57 | 111 |
| 7 | 12N5-3B | DC | -, | 12 | 4 | 120 | 61 | 130 |
| 8 | 12N5-4B | DC | ,- | 12 | 4 | 120 | 61 | 130 |
| 9 | YB5L-B | DC-HD | -, | 12 | 4 | 120 | 61 | 130 |
| 10 | 12N6-3B | DC | -, | 12 | 6 | 137 | 72 | 95 |
| 11 | YB6L-B | DC-HD | -, | 12 | 6 | 137 | 72 | 95 |
| 12 | 12N6.5-3B | DC | -, | 12 | 6.5 | 138 | 73 | 107 |
| 13 | YB6.5L-B | DC-HD | -, | 12 | 6.5 | 138 | 73 | 107 |
| 14 | 12N7A-3A | DC | -, | 12 | 7 | 150 | 60 | 130 |
| 15 | 12N7B-3A | DC | -, | 12 | 7 | 150 | 60 | 130 |
| 16 | 12N7A-4A | DC | ,- | 12 | 7 | 150 | 60 | 130 |
| 17 | 12N7B-4A | DC | ,- | 12 | 7 | 150 | 60 | 130 |
| 18 | YB7B-B | DC-HD | ,- | 12 | 7 | 150 | 60 | 130 |
| 19 | 12N7-3A | DC | -, | 12 | 7 | 135 | 75 | 133 |
| 20 | 12N7-3B | DC | -, | 12 | 7 | 135 | 75 | 133 |
| 21 | 12N7-4A | DC | ,- | 12 | 7 | 135 | 75 | 133 |
| 22 | 12N7-4B | DC | ,- | 12 | 7 | 135 | 75 | 133 |
| 23 | YB7L-B | DC-HD | ,- | 12 | 7 | 135 | 75 | 133 |
| 24 | 12N9-3A | DC | -, | 12 | 9 | 135 | 75 | 139 |
| 25 | 12N9-3B | DC | -, | 12 | 9 | 135 | 75 | 139 |
| 26 | 12N9-3B | DC | ,- | 12 | 9 | 135 | 75 | 139 |
| 27 | 12N9-4B-1 | DC | ,- | 12 | 9 | 135 | 75 | 139 |
| 28 | YB9-B | DC-HD | ,- | 12 | 9 | 135 | 75 | 139 |
| 29 | 12N10-3B | DC | -, | 12 | 10 | 134 | 90 | 145 |
| 30 | 12N10-3B-1 | DC | -, | 12 | 10 | 134 | 90 | 145 |
| 31 | YB10L-B1 | DC-HD | -, | 12 | 10 | 134 | 90 | 145 |
| 32 | 12N12A-4A-1 | DC | ,- | 12 | 10 | 136 | 76 | 160 |
| 33 | YB12A-A | DC-HD | ,- | 12 | 12 | 134 | 76 | 160 |
| 34 | YB12AL-A | DC-HD | -, | 12 | 12 | 134 | 76 | 160 |
| 35 | 12N14-3A | DC | -, | 12 | 12 | 136 | 90 | 164 |
| 36 | 12N14-3B | DC | -, | 12 | 12 | 136 | 90 | 164 |
| 37 | YB14-A2 | DC-HD | ,- | 12 | 12 | 136 | 90 | 164 |
| 38 | YB14L-A2 | DC-HD | -, | 12 | 12 | 136 | 90 | 164 |
| 39 | 51913 | DC | -, | 12 | 19 | 185 | 82 | 170 |
| 40 | YB2.5L-C | DC-HD | -, | 12 | 2.5 | 80 | 70 | 105 |
| 41 | YB2.5L-C2 | DC-HD | -, | 12 | 2.5 | 80 | 70 | 105 |
| 42 | 12N3-3A | DC | -, | 12 | 3 | 98 | 56 | 110 |
| 43 | YB3L-A | DC-HD | -, | 12 | 3 | 98 | 56 | 110 |
| 44 | YB3L-B | DC-HD | -, | 12 | 3 | 98 | 56 | 110 |
| 45 | YB3L-C | DC-HD | -, | 12 | 3 | 98 | 56 | 110 |
| 46 | YB4L-B | DC-HD | -, | 12 | 4 | 120 | 70 | 92 |
| 47 | YB16-B | DC-HD | ,- | 12 | 16 | 175 | 100 | 155 |
| 48 | YB16L-B | DC-HD | -, | 12 | 16 | 175 | 100 | 155 |
| 49 | 12N16-3B | DC | -, | 12 | 16 | 175 | 100 | 155 |
| 50 | 12N16-4B | DC-HD | ,- | 12 | 16 | 175 | 100 | 155 |
| 51 | YB16AL-A2 | DC-HD | -, | 12 | 16 | 205 | 70 | 162 |
| 52 | B38-6A | DC-HD | -, | 6 | 13 | 119 | 83 | 161 |
Dry Charge / Conventional Battery Charging Procedure
Follow the steps below carefully to ensure safe and effective battery activation and charging:
- Place the Battery Correctly
Set the battery on a level and stable surface. - Remove Filler Caps
Take off the yellow filler caps and keep them safely aside. - Remove the Vent Sealing Cap
Remove the sealing cap from the vent outlet.
Do not reinstall this cap after filling, as trapped gases can cause the battery to rupture. - Fill with Electrolyte
Fill each cell with battery-grade electrolyte to the indicated fill line on the battery case.-
Wear protective gloves and eyewear
-
Electrolyte specific gravity must be 1.265
-
Temperature should be between 62°F and 86°F (16°C – 30°C)
-
- Rest the Battery
Allow the battery to sit for at least 30 minutes.
Gently tap the case to release any air bubbles trapped between the plates. - Recheck Electrolyte Level
If the level drops, refill to the upper fill line. - Begin Charging
Replace the filler caps loosely and charge the battery at 1/10th of its rated Ah capacity for 3–5 hours.
Charging at higher rates may damage the battery. - Safety During Charging
Do not connect or disconnect the battery while the charger is switched ON, as sparks may ignite hydrogen gas. - Monitor Levels
Check electrolyte levels during charging and top up as needed. - Finish Charging
When charging is complete:-
Turn off the charger
-
Disconnect the charger from the battery
-
- Secure the Filler Caps
Push or screw down the yellow filler caps—do not over-tighten. - Clean Any Spills
Neutralize and wipe spills using a baking soda + water solution. - Rest Before Testing
Let the battery stand for at least 30 minutes after charging. - Perform a Load Test
Load test the battery at 3 × its Ah rating for 15 seconds, or use an automatic battery tester. - Check Final Voltage
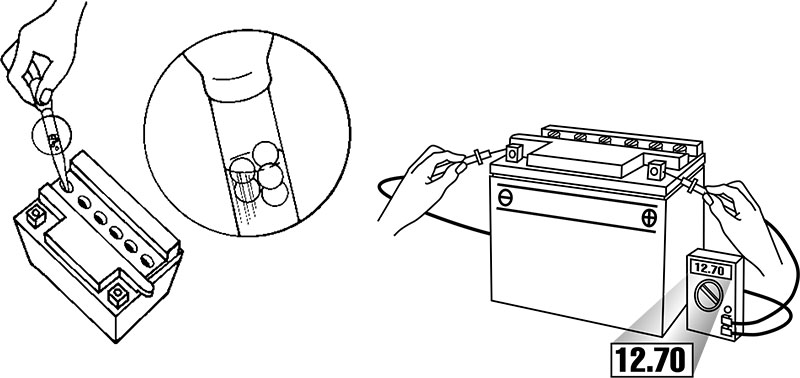
A healthy, fully charged 12V battery should show a minimum of 12.4V.
Key Features of Motofine Sealed Batteries
Sealed Construction
Motofine batteries are manufactured with a precision-sealed design that ensures no electrolyte leakage from the case or terminal points. This provides clean, reliable, and safe handling in all conditions.
Electrolyte Suspension System
Our batteries utilize a microfine glass mat electrolyte suspension system, allowing the cells to retain the maximum amount of electrolyte within the separator material.
Because the electrolyte is absorbed in the glass mat, there is no free liquid, and no gels or additional additives are required—ensuring consistent performance and long service life.
Oxygen Recombination Technology
Motofine sealed batteries are engineered using advanced oxygen recombination technology, which reuses internal gases during charging. This eliminates the need for topping up with distilled water, making the battery easy to use and maintain.
Low Maintenance Operation
Thanks to the sealed design and efficient internal gas recombination process, Motofine batteries are virtually maintenance-free throughout their operating life.
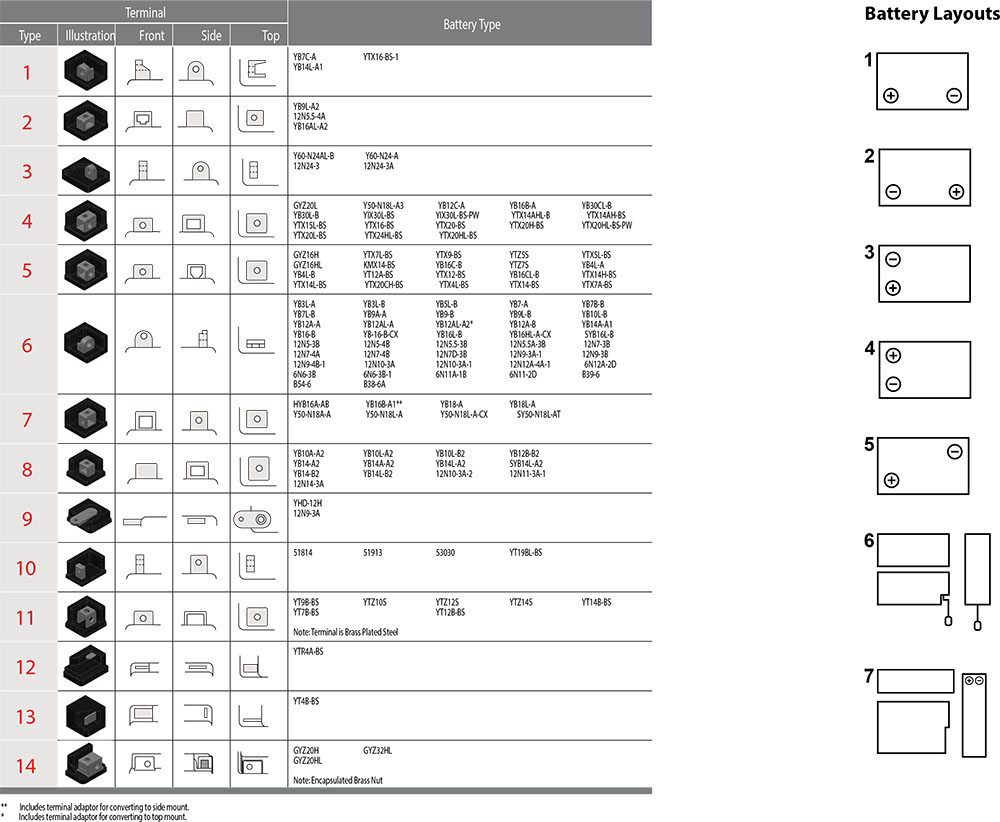
Terminals & Fitment
Motofine batteries are available with a variety of terminal designs to suit different vehicle models and equipment types.
To ensure correct installation, always refer to the terminal configuration chart associated with your selected battery model.
Note: Terminal shape and position vary from battery to battery. Selecting the recommended part number ensures correct fit, secure connection, and optimum performance.
Battery Safety & Handling Guidelines
Batteries must always be handled with care. During charging, batteries can release flammable gases and contain corrosive sulfuric acid, which can be hazardous if proper precautions are not followed.
Safety Checklist
- No Flames or Sparks:
Keep the battery area free from smoking, open flames, and sparks. Charging batteries may release hydrogen and oxygen, which can ignite and cause the battery to rupture. - Ventilation is Essential:
When charging conventional batteries, always loosen the vent caps and ensure there is good airflow in the charging area to prevent gas build-up. - Prevent Gas Accumulation:
A poorly ventilated charging area can allow hydrogen and oxygen to collect, creating an explosion risk. - Watch for Overheating:
If the battery becomes hot to the touch, stop charging and let it cool before continuing. Excessive heat can damage battery plates or cause rupture. - Do Not Reinstall Sealing Caps:
Once the sealing cap is removed from the vent, never replace it. Trapped gases can cause explosion. Ensure vent tubes are not blocked or kinked. - Correct Charger Connection:
Always connect Positive (+) to Positive and Negative (–) to Negative.
Turn off/unplug the charger before disconnecting the leads to prevent sparking.
Points to Remember
-
Ensure good ventilation while charging
-
No smoking or open flames near charging batteries
-
Wear safety glasses or a face shield to protect your eyes
-
If electrolyte contacts eyes or skin, rinse immediately and seek medical attention
-
Review and follow safety instructions regularly
Battery Testing Tools
To check the battery’s state of charge, use either of the following:
-
Hydrometer (available as floating ball or calibrated float types)
-
Voltmeter or Multimeter (measures DC voltage)
Which Tool Should You Use?
-
For conventional batteries, a calibrated float hydrometer provides the most accurate specific gravity reading.
-
For Sealed VRLA / SMF batteries, use a voltmeter, since the electrolyte cannot be accessed.
Using a Voltmeter Correctly
-
Ensure it is set to DC voltage mode
-
Connect the meter in parallel, observing correct polarity:
-
Positive lead → Battery (+)
-
Negative lead → Battery (–)
-
-
Methods of Checking Battery Condition
There are two main types of battery tests used to determine battery health and charge condition:
-
Unloaded Test
-
Loaded Test
The Unloaded Test is quick and commonly used, as it checks battery charge without applying a discharge load.
For a more precise evaluation, especially of starting performance, a Loaded Test is recommended.
Unloaded Testing
You can check the state of charge using either a Voltmeter or a Hydrometer:
Using a Voltmeter
-
Connect the positive lead of the voltmeter to the positive (+) terminal of the battery.
-
Connect the negative lead to the negative (–) terminal.
-
The voltage reading displayed will give the instant charge condition of the battery.
Using a Hydrometer
-
A hydrometer measures the specific gravity of the electrolyte in each cell.
-
The specific gravity value indicates the battery’s level of charge.
Typical Specific Gravity Readings:
| Battery Condition | Specific Gravity Range |
|---|---|
| Fully Charged | 1.265 – 1.280 |
| Needs Charging | 1.230 – 1.260 |
If the reading is below 1.230, charge the battery before continuing further tests.
Comparison of Testing Methods
Battery state of charge can be checked using:
-
Syringe-type hydrometer (float gauge)
-
Digital voltmeter
-
5-ball hydrometer
Note:
For Sealed VRLA / SMF batteries, use a voltmeter, as their electrolyte cannot be accessed for hydrometer testing.